Best MacBook Pro 15" Retina Display Mid 2012 - Early 2013 Replacement Battery
Image

| Battery | Check Current Price |
|---|---|
| ROLADA Battery Replacement for MacBook Pro 15 Inch Retina A1398 (2012 Early-2013 Version) | View On Amazon |
| HUSAN Battery Compatible with MacBook Retina Pro 15" A1398 (2012 Early-2013 Version) | View On Amazon |
MacBooks with retina displays are a class apart from others in the market. It is obvious that features and hardware that take up a lot of energy, drain out the battery quicker. This is why most tech gurus believe in replacing the existing battery instead of changing the complete laptop!
Read below to find out the best battery replacement models for MacBook Pro 15" Retina Display Mid 2012 - Early 2013, as well as how to know it is time to replace your present battery.
How to know if you should replace your MacBook Pro 15" Retina Display Mid 2012 - Early 2013 battery?
One of the best features of the MacBook Pro 15" Retina Display Mid 2012 - Early 2013 is that it continually monitors the health and condition of the battery. It gives you the information needed and lets you know when it is time to repair, change, or replace it. To do so, follow these quick and simple steps without any professional help!
- Press down the Option key and then click on the Apple menu on the top left of your screen.
- Open System Information and go to Power under the Hardware section.
- You will be able to see the current cycle count and condition of your battery under Battery Information.
Top battery replacement options for the MacBook Pro 15" Retina Display Mid 2012 - Early 2013
ROLADA Battery Replacement for MacBook Pro 15 Inch Retina A1398 (2012 Early-2013 Version)
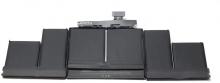
The ROLADA Laptop Battery Replacement for MacBook Pro 15 Inch Retina A1398 (2012 Early-2013 Version) is a 10.95 Volts set of four Lithium-ion batteries. It offers complete charging protection with its multi-protection features such as Over-Voltage Protection and Short-Circuiting Protection. The battery comes with the needed set of four screwdrivers to complete the replacement, and the battery is also CE- /FCC- /RoHS certified for safety.
Compatibility -
MacBook Pro 15" A1398 2012 and Early 2013 Retina Series (Only Work for 2012 Early 2013 Version, Won't fit Late 2013 or 2014 Version). This model is a MacBook Pro A1417 battery, not a MacBook A1494 battery.
HUSAN Battery Compatible with MacBook Retina Pro 15" A1398 (2012 Early-2013 Version)
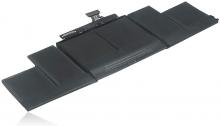
The HUSAN Laptop Battery Compatible with MacBook Retina Pro 15" A1398 (2012 Early-2013 Version) is a fast charging and efficient replacement option for your MacBook. The 6 Cell Li-Polymer battery has a capacity of 95Wh 8460mAh and a Voltage of 10.95V. It provides low power consumption as well as offers several built-in protection circuits that ensure the safety and stability of the battery and laptop. Get two free screwdrivers with the battery to carry out the replacement yourself.
Compatibility -
MacBook Pro 15" "Core i7" A1398 2012 Early-2013 Retina Series
MD831LL/A MC975LL/A MC976LL/A ME665LL/A ME664LL/A
MacBook Pro "Core i7" 2.3 15" Retina Series
MacBook Pro "Core i7" 2.4 15" Retina Series
MacBook Pro "Core i7" 2.6 15" Retina Series
MacBook Pro "Core i7" 2.7 15" Retina Series
MacBook Pro "Core i7" Early-2013 2.7 15" Retina Series
MacBook Pro "Core i7" Early-2013 2.8 15" Retina Series
How to replace the MacBook Pro 15" Retina Display Mid 2012 - Early 2013 original battery?
Step 1 -
Turn the MacBook Pro 15" Retina Display Mid 2012 - Early 2013 upside down and start by removing the ten case screws.
Step 2 -
Feel down the side and slide your fingernail under the cover to lift it gently.
Step 3 -
Remove the connector from the motherboard so you've isolated the power from the battery.
Step 4 -
Locate the two screws that secure the battery in place and unscrew those next.
Step 5 -
Use the secret weapon of choice, which is isopropanol alcohol, with a little straw so that it gets under the battery. You can tilt the laptop slightly, just enough for the isopropanol to spread under the battery to make the adhesion a little bit easier to remove.
Step 6 -
Using a plastic tool, move the battery out of place by nudging it out carefully. Once you can feel the batteries moving around freely, pry it up and gently remove it.
Step 7 -
Clean the remaining adhesive and line the new battery up in place, following the above steps in reverse order to put the laptop back together.
